> ## Documentation Index
> Fetch the complete documentation index at: https://docs.photalabs.com/llms.txt
> Use this file to discover all available pages before exploring further.
# Profiles
> Understand how profiles enable identity-preserving photo editing and generation
export const MIN_QUICK_PROFILE_PHOTOS = 5;
export const MIN_PROFILE_PHOTOS = 10;
export const MAX_QUICK_PROFILE_PHOTOS = 10;
export const MAX_PROFILE_PHOTOS = 50;
Profiles are the core concept that makes Phota different from generic image generation. A profile teaches the API what a
specific person looks like, so their identity is preserved across all edits and generations.
***
## What is a profile?
A profile is a learned representation of a specific person's appearance. You create one by uploading reference
photos of the same person — {MIN_PROFILE_PHOTOS}–{MAX_PROFILE_PHOTOS} for the default Full Train tier, or {MIN_QUICK_PROFILE_PHOTOS}–{MAX_QUICK_PROFILE_PHOTOS} for Quick Train (see [Training tiers](#training-tiers)).
Phota processes these photos to learn the subject's facial features, hair, skin tone, and overall appearance.
Once a profile is trained, you can use it across unlimited edit, generate, and enhance requests. The API preserves the
person's identity even through dramatic transformations -- placing them on a beach, changing their outfit, or restyling
the entire scene.
 Upload {MIN_PROFILE_PHOTOS}–{MAX_PROFILE_PHOTOS} reference photos to create a profile ({MIN_QUICK_PROFILE_PHOTOS}–{MAX_QUICK_PROFILE_PHOTOS} for Quick Train). Group shots are OK as long as your intended subject is the
most common one across all photos.
***
## How profiles work
Profiles work in two phases:
1. **Training** -- you upload reference photos and the API learns the subject's appearance (facial features, hair, skin tone, etc.).
2. **Inference** -- when you call `/edit`, `/generate`, or `/enhance`, the API recognizes people in the input image
(or described in the prompt) and decides which profiles from the candidate profiles to use to preserve their
identities in the output. The fewer candidate profiles you pass, the easier it is for the API to match the right one.
If a profile is not provided in the candidate profiles, the API will not consider it when matching.
**A typical integration:** your user uploads photos -> you call the profile training endpoint -> you get back a
`profile_id` -> you pass that profile in every edit or generation you run for them. Multi-person scenes work too —
reference multiple `[[profile_id]]` values in a single prompt.
Profiles are opt-in per request. If you don't pass any profile IDs, the API will not attempt to preserve anyone's identity, even if trained profiles exist in your account. For anything where the subject needs to look like a specific person, include the relevant profile IDs.
***
## Profile creation
Creating and using a profile follows this flow:
```mermaid actions={false} theme={null}
flowchart LR
Upload["Upload 10-50 photos (5-10 for Quick Train)"] --> Training["Training starts"]
Training --> Poll["Poll status"]
Poll -->|VALIDATING / QUEUING / IN_PROGRESS| Wait["Wait 10-30s"]
Wait --> Poll
Poll -->|READY| Use["Use in /edit, /generate, /enhance"]
Poll -->|ERROR| Error["Check error message"]
```
Send the reference image URLs to `POST /profiles/add`. Training starts immediately and runs asynchronously. You receive
a `profile_id` right away.
```json theme={null}
{
"image_urls": ["https://example.com/photo1.jpg", "https://example.com/photo2.jpg", "https://example.com/photo3.jpg"],
"tag": "user_abc123"
}
```
The `tag` field is optional. Use it to group profiles by your own identifiers (e.g., end-user usernames) so you can
filter them later with `GET /profiles/ids?tag=user_abc123`. See [Tagging profiles](#tagging-profiles) below.
Call `GET /profiles/{profile_id}/status` until the status is `READY`. Training typically takes \~20 minutes.
| Status | Meaning |
| ------------- | ------------------------------------------------------------------------------------------------ |
| `VALIDATING` | Images are being validated and prepared. Poll again in 10-30 seconds. |
| `QUEUING` | Training job is queued. Poll again in 10-30 seconds. |
| `IN_PROGRESS` | Model is actively training. Expected to finish within \~20 minutes. Poll again in 10-30 seconds. |
| `READY` | Training completed. The profile is ready for use. |
| `ERROR` | Training failed. Check the `message` field for details. |
Once ready, reference the profile in any edit, generate, or enhance request. See
[Referencing profiles in requests](#referencing-profiles-in-requests) below.
***
## Tagging profiles
Tags let you group profiles by your own identifiers -- for example, your end-user's username or account ID. This is
useful when your API key manages profiles for many end-users and you need to list only the profiles belonging to a
specific one.
### Setting a tag
Pass the optional `tag` field when creating a profile:
```json theme={null}
{
"image_urls": ["https://example.com/photo1.jpg", "..."],
"tag": "user_abc123"
}
```
Tags are free-form strings up to 128 characters. A profile can have at most one tag, and multiple profiles can share
the same tag.
### Filtering by tag
Use the `tag` query parameter on `GET /profiles/ids` to retrieve only profiles with a specific tag:
```bash theme={null}
curl https://api.photalabs.com/v1/phota/profiles/ids?tag=user_abc123 \
-H "X-API-Key: YOUR_API_KEY"
```
Omitting the `tag` parameter returns all profiles.
***
## Referencing profiles in requests
There are two mechanisms for referencing a profile: the `profile_ids` request field and inline `[[profile_id]]` prompt
syntax. **In most cases you pick one, not both.** If you do use both, the API merges them automatically — there's no
benefit to duplicating the same ID in both places.
Your developer account holds all profiles, but only pass the ones belonging to the end-user whose photo is being
processed. This ensures correct identity matching and billing.
### The `profile_ids` field (edit and enhance)
This array tells the API which profiles are available as candidates for the request — typically all profiles belonging
to a single end-user. The API matches the people in the input photo to these candidates automatically, so you don't
have to name anyone in the prompt:
```json theme={null}
{
"prompt": "Make the sun shine through the trees",
"images": ["https://example.com/photo.jpg"],
"profile_ids": ["abc123", "def456"]
}
```
### The `[[profile_id]]` prompt syntax (edit and generate)
Inline `[[profile_id]]` in the `prompt` attaches a profile to a specific phrase, so the model knows exactly which
person the prompt is talking about. This works with any number of subjects — a single reference is perfectly fine:
```json theme={null}
{
"prompt": "Make [[abc123]] smile wider",
"images": ["https://example.com/photo.jpg"]
}
```
It's also the only way to reference profiles in generation (which has no `profile_ids` field) and the clearest way to
refer to multiple people in one prompt:
```json theme={null}
{
"prompt": "A photo of [[abc123]] and [[def456]] at a dinner party"
}
```
```json theme={null}
{
"prompt": "Change [[abc123]]'s clothes to red, and add [[def456]] standing next to them",
"images": ["https://example.com/photo.jpg"]
}
```
When `[[profile_id]]` appears in an edit prompt, it's automatically merged into the `profile_ids` candidate list — you
don't need to list the same ID in both places.
### Which should I use?
| Endpoint | Prompt doesn't name the subject | Prompt refers to a specific subject |
| ----------- | ------------------------------- | -------------------------------------------------------------- |
| `/edit` | `profile_ids` | `[[profile_id]]` in the prompt (`profile_ids` optional) |
| `/generate` | N/A — use `[[profile_id]]` | `[[profile_id]]` in the prompt (no `profile_ids` field exists) |
| `/enhance` | `profile_ids` | N/A — `/enhance` has no prompt |
Either mechanism is enough on its own for `/edit`. If you use both, the API merges them, so there's no need to list
the same ID in both places.
***
## Training tiers
Profile training has two tiers, selected with the `training_tier` field on `POST /profiles/add`:
| Tier | `training_tier` | Images | Cost | When to use |
| -------------------- | --------------- | ----------------------------------------------------- | ------ | ------------------------------------------------------ |
| Full Train (default) | `standard` | {MIN_PROFILE_PHOTOS}–{MAX_PROFILE_PHOTOS} | \$2.90 | Highest fidelity. Recommended for most production use. |
| Quick Train | `fast` | {MIN_QUICK_PROFILE_PHOTOS}–{MAX_QUICK_PROFILE_PHOTOS} | \$1.49 | Faster, cheaper profile from fewer photos. |
Quick Train completes in **\~3 minutes**; Full Train completes in **\~8 minutes** (both excluding queue time). For the strongest profile, use Full Train with {MAX_PROFILE_PHOTOS} images.
## Image requirements for training
* **Full Train** (`training_tier: "standard"`): {MIN_PROFILE_PHOTOS}–{MAX_PROFILE_PHOTOS} images
* **Quick Train** (`training_tier: "fast"`): {MIN_QUICK_PROFILE_PHOTOS}–{MAX_QUICK_PROFILE_PHOTOS} images
* **Format**: publicly accessible URLs (signed URLs work)
### Tips for best results
Upload {MIN_PROFILE_PHOTOS}–{MAX_PROFILE_PHOTOS} reference photos to create a profile ({MIN_QUICK_PROFILE_PHOTOS}–{MAX_QUICK_PROFILE_PHOTOS} for Quick Train). Group shots are OK as long as your intended subject is the
most common one across all photos.
***
## How profiles work
Profiles work in two phases:
1. **Training** -- you upload reference photos and the API learns the subject's appearance (facial features, hair, skin tone, etc.).
2. **Inference** -- when you call `/edit`, `/generate`, or `/enhance`, the API recognizes people in the input image
(or described in the prompt) and decides which profiles from the candidate profiles to use to preserve their
identities in the output. The fewer candidate profiles you pass, the easier it is for the API to match the right one.
If a profile is not provided in the candidate profiles, the API will not consider it when matching.
**A typical integration:** your user uploads photos -> you call the profile training endpoint -> you get back a
`profile_id` -> you pass that profile in every edit or generation you run for them. Multi-person scenes work too —
reference multiple `[[profile_id]]` values in a single prompt.
Profiles are opt-in per request. If you don't pass any profile IDs, the API will not attempt to preserve anyone's identity, even if trained profiles exist in your account. For anything where the subject needs to look like a specific person, include the relevant profile IDs.
***
## Profile creation
Creating and using a profile follows this flow:
```mermaid actions={false} theme={null}
flowchart LR
Upload["Upload 10-50 photos (5-10 for Quick Train)"] --> Training["Training starts"]
Training --> Poll["Poll status"]
Poll -->|VALIDATING / QUEUING / IN_PROGRESS| Wait["Wait 10-30s"]
Wait --> Poll
Poll -->|READY| Use["Use in /edit, /generate, /enhance"]
Poll -->|ERROR| Error["Check error message"]
```
Send the reference image URLs to `POST /profiles/add`. Training starts immediately and runs asynchronously. You receive
a `profile_id` right away.
```json theme={null}
{
"image_urls": ["https://example.com/photo1.jpg", "https://example.com/photo2.jpg", "https://example.com/photo3.jpg"],
"tag": "user_abc123"
}
```
The `tag` field is optional. Use it to group profiles by your own identifiers (e.g., end-user usernames) so you can
filter them later with `GET /profiles/ids?tag=user_abc123`. See [Tagging profiles](#tagging-profiles) below.
Call `GET /profiles/{profile_id}/status` until the status is `READY`. Training typically takes \~20 minutes.
| Status | Meaning |
| ------------- | ------------------------------------------------------------------------------------------------ |
| `VALIDATING` | Images are being validated and prepared. Poll again in 10-30 seconds. |
| `QUEUING` | Training job is queued. Poll again in 10-30 seconds. |
| `IN_PROGRESS` | Model is actively training. Expected to finish within \~20 minutes. Poll again in 10-30 seconds. |
| `READY` | Training completed. The profile is ready for use. |
| `ERROR` | Training failed. Check the `message` field for details. |
Once ready, reference the profile in any edit, generate, or enhance request. See
[Referencing profiles in requests](#referencing-profiles-in-requests) below.
***
## Tagging profiles
Tags let you group profiles by your own identifiers -- for example, your end-user's username or account ID. This is
useful when your API key manages profiles for many end-users and you need to list only the profiles belonging to a
specific one.
### Setting a tag
Pass the optional `tag` field when creating a profile:
```json theme={null}
{
"image_urls": ["https://example.com/photo1.jpg", "..."],
"tag": "user_abc123"
}
```
Tags are free-form strings up to 128 characters. A profile can have at most one tag, and multiple profiles can share
the same tag.
### Filtering by tag
Use the `tag` query parameter on `GET /profiles/ids` to retrieve only profiles with a specific tag:
```bash theme={null}
curl https://api.photalabs.com/v1/phota/profiles/ids?tag=user_abc123 \
-H "X-API-Key: YOUR_API_KEY"
```
Omitting the `tag` parameter returns all profiles.
***
## Referencing profiles in requests
There are two mechanisms for referencing a profile: the `profile_ids` request field and inline `[[profile_id]]` prompt
syntax. **In most cases you pick one, not both.** If you do use both, the API merges them automatically — there's no
benefit to duplicating the same ID in both places.
Your developer account holds all profiles, but only pass the ones belonging to the end-user whose photo is being
processed. This ensures correct identity matching and billing.
### The `profile_ids` field (edit and enhance)
This array tells the API which profiles are available as candidates for the request — typically all profiles belonging
to a single end-user. The API matches the people in the input photo to these candidates automatically, so you don't
have to name anyone in the prompt:
```json theme={null}
{
"prompt": "Make the sun shine through the trees",
"images": ["https://example.com/photo.jpg"],
"profile_ids": ["abc123", "def456"]
}
```
### The `[[profile_id]]` prompt syntax (edit and generate)
Inline `[[profile_id]]` in the `prompt` attaches a profile to a specific phrase, so the model knows exactly which
person the prompt is talking about. This works with any number of subjects — a single reference is perfectly fine:
```json theme={null}
{
"prompt": "Make [[abc123]] smile wider",
"images": ["https://example.com/photo.jpg"]
}
```
It's also the only way to reference profiles in generation (which has no `profile_ids` field) and the clearest way to
refer to multiple people in one prompt:
```json theme={null}
{
"prompt": "A photo of [[abc123]] and [[def456]] at a dinner party"
}
```
```json theme={null}
{
"prompt": "Change [[abc123]]'s clothes to red, and add [[def456]] standing next to them",
"images": ["https://example.com/photo.jpg"]
}
```
When `[[profile_id]]` appears in an edit prompt, it's automatically merged into the `profile_ids` candidate list — you
don't need to list the same ID in both places.
### Which should I use?
| Endpoint | Prompt doesn't name the subject | Prompt refers to a specific subject |
| ----------- | ------------------------------- | -------------------------------------------------------------- |
| `/edit` | `profile_ids` | `[[profile_id]]` in the prompt (`profile_ids` optional) |
| `/generate` | N/A — use `[[profile_id]]` | `[[profile_id]]` in the prompt (no `profile_ids` field exists) |
| `/enhance` | `profile_ids` | N/A — `/enhance` has no prompt |
Either mechanism is enough on its own for `/edit`. If you use both, the API merges them, so there's no need to list
the same ID in both places.
***
## Training tiers
Profile training has two tiers, selected with the `training_tier` field on `POST /profiles/add`:
| Tier | `training_tier` | Images | Cost | When to use |
| -------------------- | --------------- | ----------------------------------------------------- | ------ | ------------------------------------------------------ |
| Full Train (default) | `standard` | {MIN_PROFILE_PHOTOS}–{MAX_PROFILE_PHOTOS} | \$2.90 | Highest fidelity. Recommended for most production use. |
| Quick Train | `fast` | {MIN_QUICK_PROFILE_PHOTOS}–{MAX_QUICK_PROFILE_PHOTOS} | \$1.49 | Faster, cheaper profile from fewer photos. |
Quick Train completes in **\~3 minutes**; Full Train completes in **\~8 minutes** (both excluding queue time). For the strongest profile, use Full Train with {MAX_PROFILE_PHOTOS} images.
## Image requirements for training
* **Full Train** (`training_tier: "standard"`): {MIN_PROFILE_PHOTOS}–{MAX_PROFILE_PHOTOS} images
* **Quick Train** (`training_tier: "fast"`): {MIN_QUICK_PROFILE_PHOTOS}–{MAX_QUICK_PROFILE_PHOTOS} images
* **Format**: publicly accessible URLs (signed URLs work)
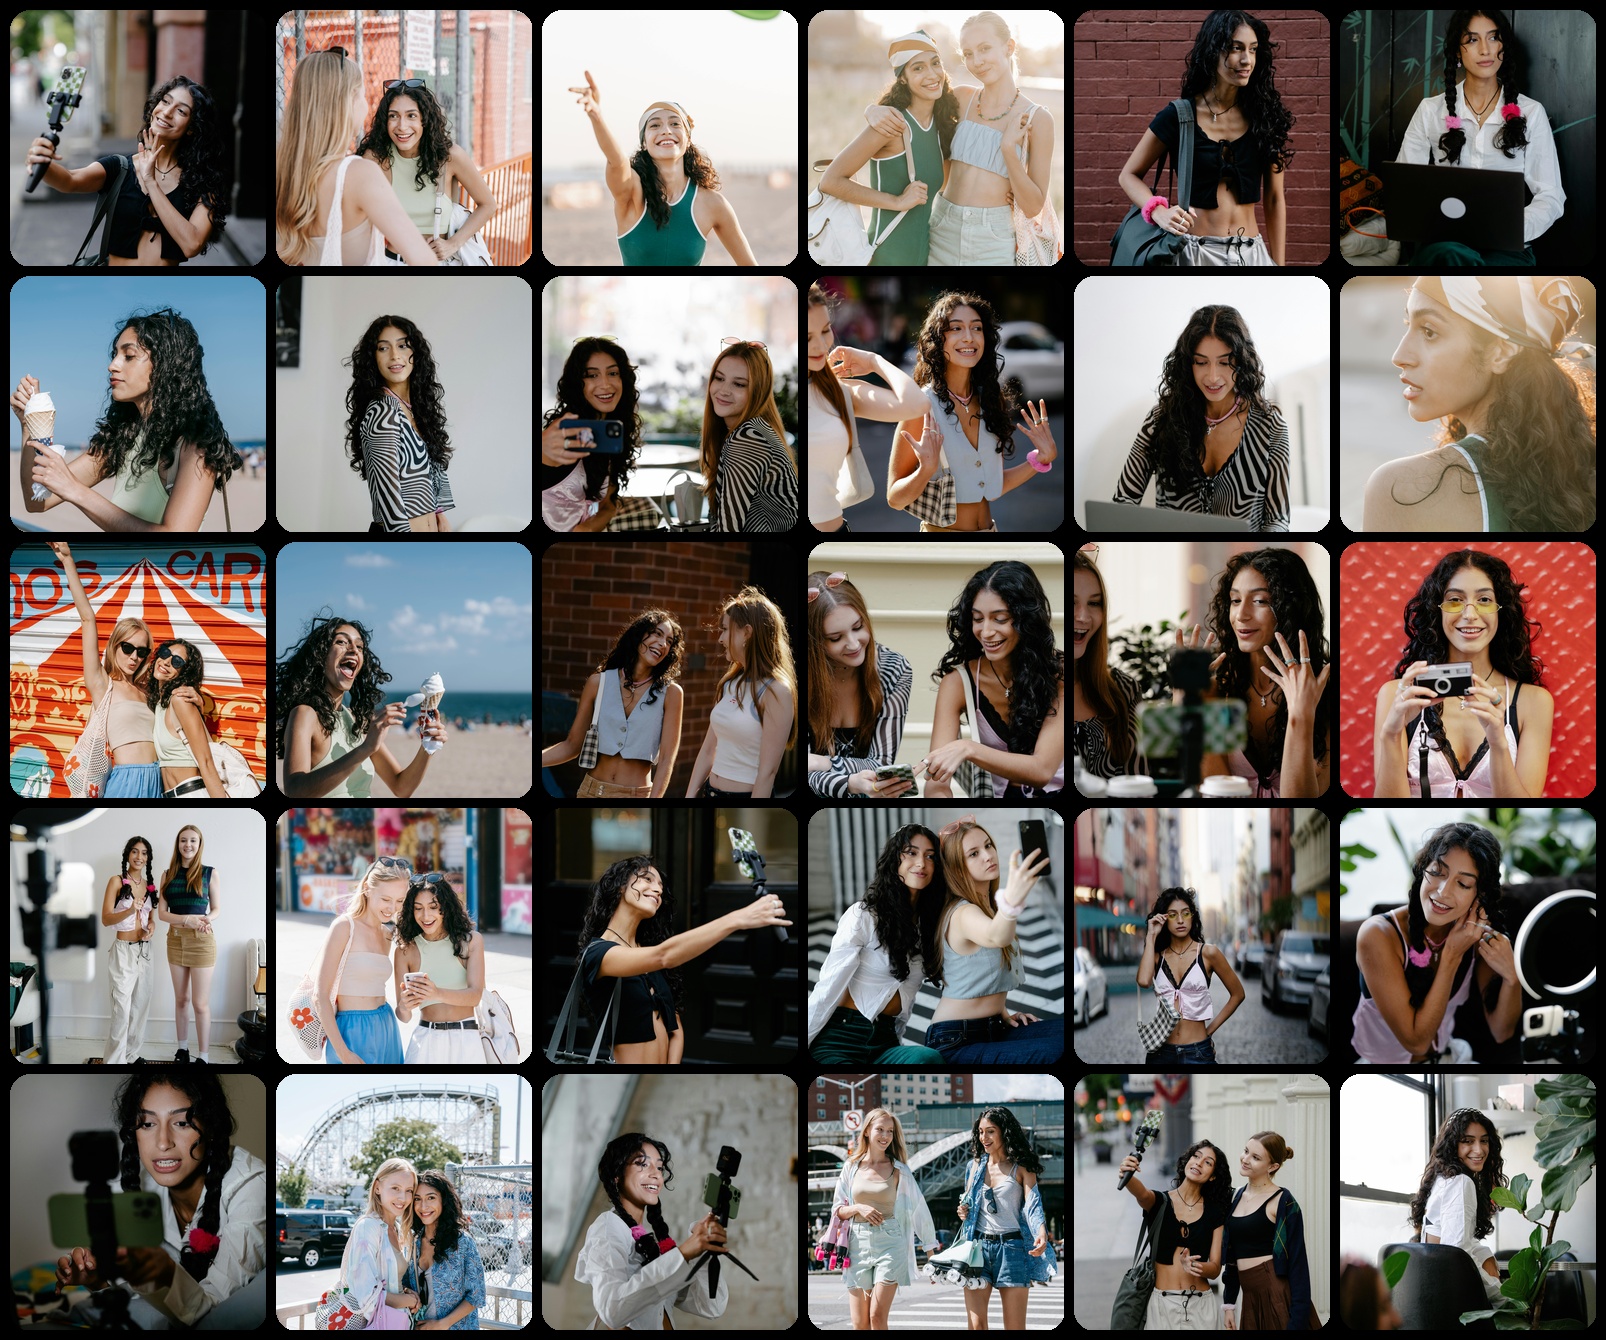
### Tips for best results
Clear, well-lit faces\
High-res 1K+ images\
Expressions: neutral, smiling, frowning, surprised\
Angles: front, slight left/right, a profile\
Lighting: indoor, outdoor, sunny, etc.\
Group shots are OK if added person's face is clear
#### Good photos
✅
Well lit and sharp
✅
Diverse expressions and angles
✅
Diverse poses
✅
Diverse accessories (face visible)
#### Bad photos
❌
Extreme poses
❌
Small, dark or noisy
❌
Largely covered and occluded
❌
Blurry from movement
***
## Next steps
Walk through the full workflow end to end.